How to create a React app out of a Webflow project

tl;dr: It can be transpiled with a single command.
As a freelancer I get to work with designers many times. Not once and not twice I have stumbled upon Webflow — a web design studio, where the designer can assemble all his assets into responsive demonstrable webpages. These webpages look neat and responsive and can be downloaded as HTML/CSS files along with their scripts, images and fonts.
At a glance, this can ease the process of getting an app done; after all we’re provided with a
working website, so surely binding some logic to it with React shouldn’t be too complicated, right?
All we need to do is take the HTML, put under a render()method of a React.Component, and
import its corresponding style with an external CSS file. Well, this is nothing but a walk in the
park.
When Webflow was first presented to me by a client of mine, I assumed the above. He showed me his website, which looked quiet complete, and we’ve proceeded to composing a plan sheet, with all the desired behavioral features of the future application and a matching price for each of that feature. I was quiet happy with our deal.
On the next morning, I’ve received an email by my client’s designer with all the exported assets by Webflow. When I looked around expecting to find the optimal starting point to go with it, my world collapsed.
The HTML files were big and massive, with lots of duplicated parts in it, the CSS was just a one big global style sheet with all the rules (that were very generic), and the images just had random machine generated names. When I started to tear it apart into React components, I’ve called my client after few hours of trial and canceled the plan; since the budget was limited, and I wasn’t willing to spend so much time on a project with a very little value in return.

Above: A Webflow page whose HTML file can be found here. Credit: campaignkit.co.
“What shall I do then?!” — A React developer
Introducing Appfairy
Appfairy is a CLI tool which can be easily installed using NPM and can integrate Webflow into a React application with a single command.
To get started, first install appfairy globally:
sudo npm install appfairy -gNow let’s think of what React components should exist in our application besides the main pages.
Once we identify them we should select their corresponding element in the Webflow project and set a
new attribute; the key’s going to be af-el (Appfairy element) and the value should be set to the
name of the component e.g. consult-form:
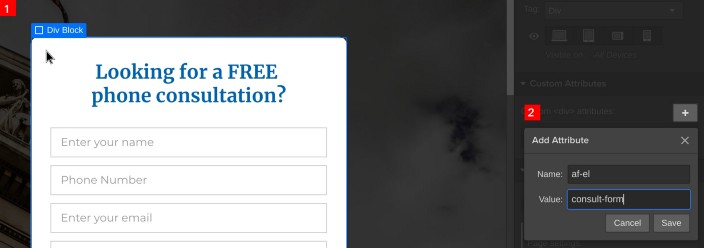
Above: Selecting the element and setting its attribute
At this point we’re one step away from generating a functional ConsultForm React component; But
before proceeding to the next step I would like to explain an important principle regards Appfairy’s
generated code’s design pattern.
Since Webflow’s code is machine generated and for the most part is not optimal, we might encounter potential maintenance issues for 2 main reasons:
- The target element we would like to update / attach event listeners to is hard to identify due to complexity of the HTML tree.
- When updating the design, we should also update our code by re-identifying the target elements and
reattaching the React logic into them, e.g. mapping functions and event handlers like
onClick().
To solve that problem, Appfairy takes on an old school approach where we separate the component into a view and a controller, where we treat the view as a black-box and don’t touch it while the controller is controlling what’s going on in there; it would tell the view what to render, when to render, and how to render.

In the picture above we have a schematic description which shows the view/controller flow. In a
brief, the controller holds elements which are proxies to the real elements, so whatever we pass to
the proxy will be forwarded automatically to the real element. A proxy and an element can be matched
based on the socket name (af-sock), which opens an interfacing point to the view by any given
controller.
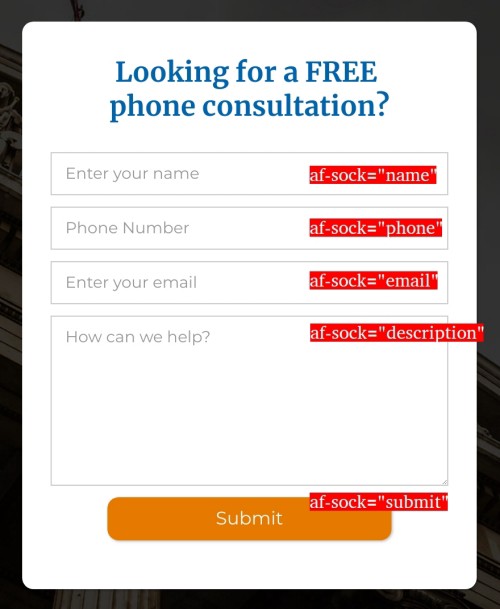
So back to our ConsultantForm in our Webflow project example, let’s think which elements should be bound to a certain logic. Generally speaking, a form has several input fields and a submit button, which will submit the data received by the inputs, therefore we would probably apply logic to these elements in our React controller components. Accordingly, we will define socket attributes to each of the elements with distinct names:
Our Webflow project is now ready for migration! To do so, we will first need to create a directory
named .appfairy in the root of our project:
mkdir .appfairyThis directory is used by Appfairy as an input for the CLI function, which means that we will need to export our project and extract the generated zip file’s content into the directory we’ve just created:
unzip ~/Downloads/project.webflow.zip -d .appfairyAbove: Exporting the project and unzipping it to
.appfairydir
All is left to do now is to run appfairy and our Webflow React components will be created and
ready to use!
appfairyAs a result a message will be printed to the terminal signifying that a new git commit has been created with modifications which consist of the following:
🗁 public (public assets which should be served by our app's server)
   🗀 images
   🗀 fonts
   🗀 css
🗁 src
   🗀 scripts (scripts that should be imported in index.js)
   🗀 styles (css files that should be imported in index.js)
   🗀 views (contains ConsultFormView - further explanation below)
The reason for the modifications to be laid out this way is because create-react-app (which is the
most common app starter for React) uses this folders structure. The output can be mapped differently
using a config file - more details about that can be found in the official
README.md file over here.
None of these files should be edited or removed and should only be managed by the appfairy
command, so whenever we update the Webflow project we should simply repeat the recent process and
the files should update accordingly.
If you’ll take a look at the views folder you’ll see that it contains a file named
ConsultFormView.js. As I already mentioned, Appfairy’s design pattern consists of a view and a
controller, therefore the exported ConsultFormView component needs to be bound to a controller.
To define a controller simply create a new file named ConsultFormController.js under the
controllers folder where the corresponding controller’s going to be exported as a React component.
The controller should contain proxies to the original elements and each proxy should forward the
necessary props. Rather than giving further explanation I would like to give you an example of a
possible implementation of a ConsultFormController:
import React from 'react'
import ConsultFormView from '../views/ConsultFormView'

class ConsultFormController extends React.Component {
  state = {}

  render() {
    return (
      <ConsultFormView>
        <name onChange={this.setName} />
        <phone onChange={this.setPhone} />
        <email onChange={this.setEmail} />
        <description onChange={this.setDescription} />
        <submit onClick={this.submit} />
      </ConsultFormView>
    )
  }

  setName = e => {
    this.setState({ name: e.target.value })
  }
  setPhone = e => {
    this.setState({ phone: e.target.value })
  }

  setEmail = e => {
    this.setState({ email: e.target.value })
  }

  setDescription = e => {
    this.setState({
      description: e.target.value
    })
  }

  submit = () => {
    alert(`
      ${this.name}
      ${this.phone}
      ${this.email}
      ${this.description}
    `)
  }
}

export default ConsultFormController
That’s it! Now you can just import the controller and use it anywhere and anytime you want, without
having to deal with the hustle of maintaining a complex machine generated Webflow code; and any time
you update the design just update your code using the appfairy command.
Above: An example usage of an Appfairy generated React component
References:
-
The full app’s source code can be found here
-
For an in-depth tutorial check out this video
-
API docs can be found in the official GitHub repo
Have fun designing/coding 🙂
Join our newsletter
Want to hear from us when there's something new? Sign up and stay up to date!
By subscribing, you agree with Beehiiv’s Terms of Service and Privacy Policy.
Recent issues of our newsletterSimilar articles

Nextra 3 – Your Favourite MDX Framework, Now on 🧪 Steroids
MDX 3, new i18n, new _meta files with JSX support, more powerful TOC, remote MDX, better bundle size, MathJax, new code block styles, shikiji, ESM-only and more
Nextra 2 – Next.js Static Site Generator
Here are what the new version of Nextra 2 Framework includes.

Unleash the power of Fragments with GraphQL Codegen
The most important parts of Relay are the concepts of building and scaling applications, let's show how you can use these patterns in your existing projects.

GraphQL with TypeScript done right
How to get the most of React application types with GraphQL Code Generator.