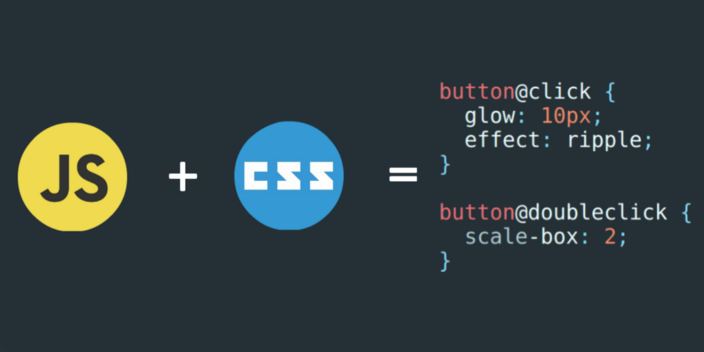
I wrote a customizable CSS engine in JavaScript

Custom Selectors, Custom Rules and Custom Events. You Determine Its Behavior
For some things CSS is simply not enough, we need JavaScript. I’m sure that we all experienced it not once, nor twice, the feeling of wanting to have a specific behavior or style that aren’t supported by CSS. An arbitrary example: selecting an element based on regular expression, playing a transition dynamically to the element’s changes in dimension, or sticky positioning (which is arguably working in some browsers based on my personal experience). However, this is not why I wrote the CSS engine.
I wrote the engine to repeat the same thinking process that the original developers went through, and to understand the difficulties and challenges that they faced. Why? Because it helps you think. With a custom implementation of CSS you can achieve exactly what I mentioned in the first paragraph and thus understand the mechanism a lot better.
disclaimer: I haven’t looked into the native implementation of CSS. There’s a lot you can take from my article (at least I hope), yet please take my words with a grain of salt.
First Thing First — Demo
Here’s an example of a stylesheet with a custom rule named boom:
.test {
  boom: red yellow white;
}
This rule will change an element’s contents to “BOOM!” and its border, background, and text color based on the given parameters. Here’s the rule in action:
https://codepen.io/eytan-manor/pen/RXPPvo
If you’ll look at the demo’s source code
(which I highly advice before you continue any further)
you’ll see how I define custom properties to my stylesheet with the
Event,
Selector
and
Rule
classes. The engine does follow the native CSS path, although it’s still in early stages and doesn’t
support many features and capabilities, such as:
- Separation of concerns for styles and events. They can still be used and modified outside the stylesheet.
- Re-evaluation of style if stylesheet gets updated.
- Selector context specifiers e.g.
>or+(e.g.div + span) - Any kind of query (
@media,@keyframes,@import, etc).
Since this is a customizable engine, with a little of creativity you can implement a lot of things, such as animations, URLs, selection and transformation functions, etc.
Indeed, there’s a lot going on under the hood and a lot to go through, so let’s get into the interesting bits.
Keynotes from the Implementation
Reading the Stylesheet
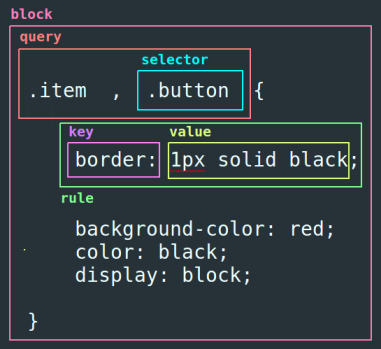
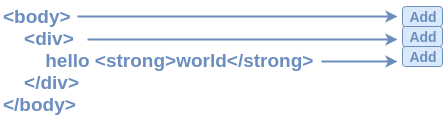
Receiving information from a given CSS string is a challenge as for itself. Since I wanted to strictly preserve the original CSS experience, I didn’t settle for a JSON, but rather an actual sheet with a set of rules and selectors. To parse it, you first need to be familiar with the concept of an AST.
AST stands for Abstract Syntax Tree, and it’s made out of a hierarchy of nodes; each node represents a different feature of the syntax. Essentially the AST is an in-memory representation of the code from which data can easily be retrieved. In this case, the retrieved data will be the selectors and the rules underneath them. If you wanna know more about the AST, I recommend you to read my article about building a Babel plug-in.
The CSS is broken down into AST nodes like following:
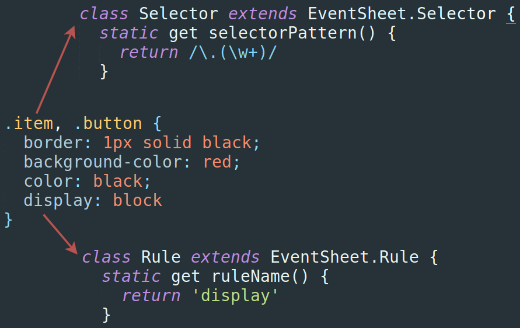
The AST is now presented as a plain JSON. To make things even more convenient, I run it through a
second iteration where it’s gonna get wrapped with the classes defined in the registry of the
stylesheet, e.g.
BoomRule
and
ClassNameSelector.
A node will be wrapped if it matches the properties of the target class:
With a wrapped AST, not only we can get information about the given CSS string, but we can also call
related methods directly from a specific node. So given a node of Selector type, we can call the
test
method to see whether an element actually matches the selector or not.
Detecting Changes in the DOM
The engine is heavily based on the
MutationObserver to detect
changes in the DOM tree. The mutation observer will trigger a callback with details regards the
occurred mutations (see
MutationRecord) from the recent
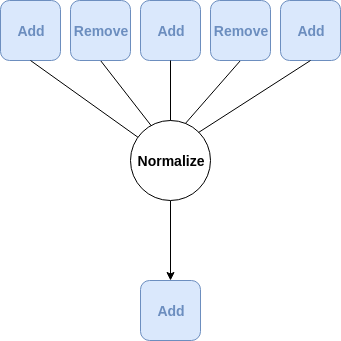
execution loop. The problem with the MutationObserver is that it will create a mutation record for
each mutation occurred without taking into an account the final result. That means that if a DOM
node was added, removed, added, removed, and then added, it will appear as if it was removed 2 times
and added 3 times, rather than added just once.
To overcome this issue, I’ve normalized the collection of mutation records to include only the
mutations which are relevant, based on the logic that I just mentioned (see
normalizeMutations()).
One of the core behaviors of CSS is that once it’s loaded, the style is immediately applied. The catch here, is that the mutation observer callback will not be invoked unless real mutations occurred. One way to apply the loaded style is to force the mutations; remove all nodes and re-add them to the observed element. However, this would be very inefficient.
The other, more efficient way of solving this is to synthesize the mutations. Yes, go through each
and every node in the DOM tree recursively and create a fake mutation JSON. Once it’s done, the set
of mutation records can be injected to the observation callback and the style should be applied
based defined customizations to the engine (see
synthesizeMutations()).
One thing to note is that we’re likely to change the style attribute inside rule event handlers,
which will unnecessarily re-trigger the mutation callback and might potentially cause an infinite
mutation loop. To avoid that I used the
takeRecords()
function to dispose the pending mutations from triggering.
function observerCallback(mutations, observer) {
  // Will cause more mutations
  updateStyle(mutations)
  // Will dispose pending mutations
  observer.takeRecords()
}
Triggering Custom Events
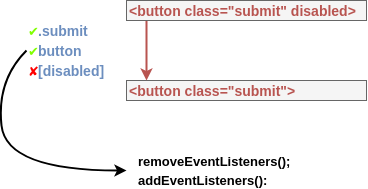
Events management is a crucial part in the implementation because it will determine the efficiency of the engine. If events aren’t disposed or reallocated exactly when needed, this will dramatically affect how fast will things work.
With each mutation callback, elements are filtered based on the selectors found in the stylesheet AST. Once an element has been cherry-picked, event listeners will be added to it based on the set of rules that are defined under the CSS block that the target selector represents at the current iteration.
The engine uses a very naive approach where events are disposed and reallocated for a specific element whenever there are incoming mutations of addition or attribute modification types. This way I make sure that even if a node was modified and a selector is not relevant anymore, only the right handlers would run once a specific event has been triggered.
function handleMutations(
  mutations,
  observer,
  { addedNodes, removedNodes, modifiedNodes } = normalizeMutations(mutations)
) {
  addedNodes.concat(modifiedNodes).forEach(mutation => {
    this.removeEventListeners(mutation)
    this.addEventListeners(mutation)
  })
}
If you looked at the source code of the demo, you probably noticed that each rule has a disposal function. In case you didn’t, here’s a snapshot of a sample rule:
class BorderRule extends EventSheet.Rule {
  static get ruleName() {
    return 'border'
  }

  ['on initialize'](e, params) {
    const border = e.target.style.border

    e.target.style.border = params

    return function dispose() {
      e.target.style.border = border
    }
  }
}
The disposal function will run each time the selector is not relevant anymore in which case the element in question will stop listening to the event. So how did I make sure that the disposal function runs on each event disposal? Simple. I’ve splitted the logic into a dedicated module which is responsible for managing the events (see events.js).
The module will add and remove events for given event target as normally, but in addition to that, it will store the event handler alongside the disposal method with internal cache maps. Once an event is removed, the corresponding disposal methods in the cache will be called as well.
function addEventListener(target, event, handler) {
  const wrappedHandler = e => {
    const dispose = handler(e)

    if (dispose != null && typeof dispose != 'function') {
      throw TypeError('return value must be a function')
    }

    // Private property
    _(wrappedHandler).dispose = dispose
  }

  // ... store in cache ...
}

function removeEventListener(target, event, handler) {
  // ... restore from cache ...

  const dispose = _(wrappedHandler).dispose

  dispose()

  // ... delete from cache ...
}
How Can It Be Better?
Disposing and Reallocating Events Only When Necessary
Right now all registered events for a specific element are being disposed and re-allocated to make sure that only the right handlers will run; this way if a selector becomes irrelevant due to recent changes to the element, it won’t effect its style.
This is a not all-too-bad yet naive approach. It works well, but it’s inefficient, something which
will become very noticeable once the stylesheet will grow bigger and bigger. One thing that can be
done is to run the
test()
function of a specific selector before event listeners are disposed. If there has been a change
in the outcome of tests, only then proceed to disposing and reallocating the event listeners.
This can be taken a step further by observing which properties of the element has changed during the application of specific rule, and store them all in-order. Once a selector becomes irrelevant and its rules don’t apply anymore, the style would be re-evaluated only relatively to the style properties which are not affected anymore. This is a very complex mechanism to implement but still achievable.
/* <div class="test shadow">  --->  <div class="shadow> */

.test {
  /*
    This affects the border, background and text properties. If the selector .test becomes irrelevant,
    only the rules which affect the properties in question will be re-evaluated.
  */
  boom: red yellow white;
}

:not(.test) {
  border: 1px solid black; /* re-evaluate */
  background: white; /* re-evaluate */
  color: black; /* re-evaluate */
}

.shadow {
  box-shadow: 10px 10px 5px 0 rgba(0, 0, 0, 0.75); /* DON'T re-evaluate */
}
Unleashing the Full Potential Using WebAssembly and WebGL
One of the clear advantages of a native CSS engine over its JavaScript equivalent, is that it’s written in a low level language such as C or C++. That can be compensated with the usage of Web Assembly, where we can write our code with Rust and compile it to a low-level language that can run on the browser. To top things up, we can use WebGL or a library such as GPU.JS to run vector calculations in parallel using all cores of the GPU.
Needless to say that this is only relevant if you want to implement graphical manipulations such as element shadows, text stroke or image filtering. It’s better to keep things simple and use only the style API which is offered to us right out-of-the-box by the browser.
Concept: Rethink Event Handling in UI Frameworks
Most modern UI frameworks such as React, Angular and Vue are tightly coupling event registering and handing with the component itself. While this has proven itself to work (greatly) over the years, a customizable stylesheet (or event sheet as you may call it) can be an alternative that can offer some benefits.
eventSheet.attach(`
  .form .field {
    font-size: 14px;
    line-height: 14px;
    width: 100%;
    padding: 5px;
  }

  .form .field.name {
    max-length: 30;
  }

  .form .field.date {
    ensure-date-input;
  }

  .form .button.submit {
    handle-submit;
  }
`)

eventSheet.observe(formEl)- The sheet can be loaded and applied on any existing DOM element regardless of the used UI framework.
- The sheet is heavily customizable and can easily share rules and behaviors between different DOM elements.
- The sheet is very declarative and easy to go through. It’s flat with no indentions of few levels deep.
- different sheets can be loaded on top of different customizations of selectors and rules.
- The sheet is lightweight and can be loaded quickly.
Have any counter claims? Prove me wrong! Or maybe prove me right :-) Constructive criticism with solid arguments from any side of the divide will be more than welcome.
☆ The source code is available on GitHub ☆
Note: It’s still just a concept. DO NOT use in production.
Join our newsletter
Want to hear from us when there's something new?
Sign up and stay up to date!
*By subscribing, you agree with Beehiiv’s Terms of Service and Privacy Policy.